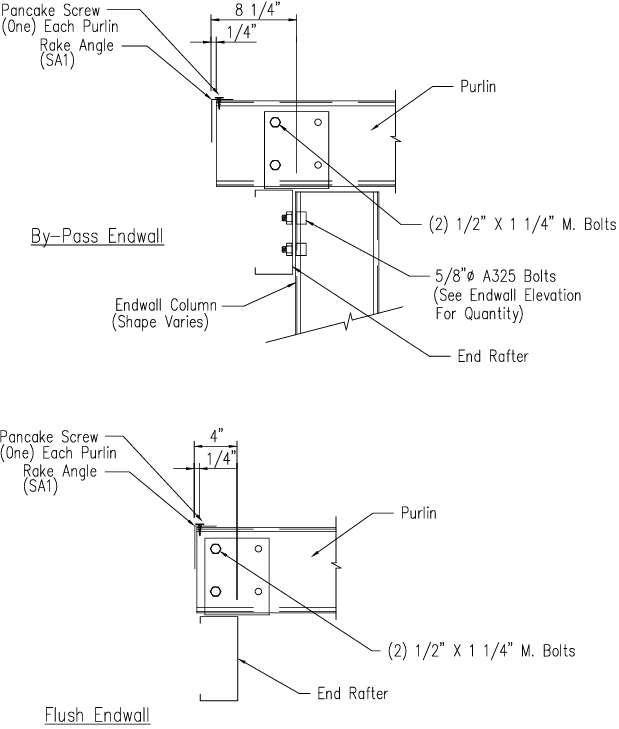
This detail and animation show the installation of the Rake Angle with a cold-form end wall rafter. The upper diagram is for a bypass end wall, and the lower is for a flush end wall. Most buildings with a cold-form end wall rafter will be in the flush condition shown at the bottom.
The Rake Angle (SA1), sometimes called a sag angle, is needed to install the building’s end wall panels to the purlin line. The rake angle must be flush with the endwall girts, i.e. in the same vertical plane as the wall panels.
This angle is recommended to be installed after the building’s girts and purlins have all been tightened, the building is plumb square, and all bolts are tightened.
For installation, you will need:
Pan Head Screws
Rake Angle
The rake angles are 4×2 14 or 16 gauge 90-degree angles and supplied in 20′ – 0″ lengths, so cutting to length is required in the field. The shorter leg should rest on top of the purlin, and the longer leg should be used to attach the panels.
For slopes that need more than one 20′ angle, a splice/lap will be necessary. The angles must be tied into a purlin on each end. You may overlap the rake angle or cut them so they line up butted together in the center of the purlin web.
Tip: 1. The pan head screws supplied are self-drilling and taping. However, it will be easier to predrill the rake angle and purlin. Hex head screws are not recommended as they may interfere with the roof panel later. 2. A #2 square drive bit should be used instead of a Philips head. The screws are compatible with both. 3. At the peak, it is recommended that the rake angle be run long enough so the vertical (4″ Leg) can be sliced at the building peak. This will allow the 2″ upper leg to bend at the peak. This saves the hassle of a difficult angled splice. A pan head screw should be used to seam the lower legs together.
You should receive your estimated quote by email shortly. Please keep in mind that this is just an estimate and does not include snow loads, wind loads, county specific code requirements, delivery or design specific engineering calculations related to the structural soundness of the building.
Text Messaging
Would you like a response via text message? Opting into SMS indicates you agree to receive SMS messages regarding your request from Great Western Buildings. Message and data rates may apply. Message frequency may vary. To end messaging from us, you may always reply with STOP. You may also reply with HELP for more information.